
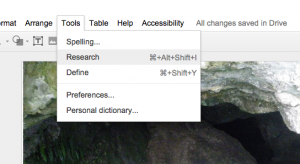
Today we were learning how to make Google Drawings and layering them with transparent png images. We were going to ‘TOOLS- Research- Images- Free to use’ to find our images.
We used ‘taniwha png’ as the search term so we would get images with transparent backgrounds.

We found our background image and layered it and went to ARRANGE – send to back, to made sure it was at the back. Then we went and got the taniwha image and put it over top. The Taniwha of the Mawhera caves lives on!

Then we took it a step further. We made an animation in Google Slides of the taniwha swimming up the river. The original image I used for the taniwha was black and it didn’t show up very well against the dark background so when I got home I imported it to Pixlr Editor (Chrome Web App) and changed the colour to white so it would show up.
Instructions for how to make transparent images and change the colour with Pixlr Editor are linked here.
To make the animation we made our first slide with the Taniwha on it, duplicated the slide and moved the taniwha image slightly, duplicated (Command + D or CTRL +D) and ever so slightly moved the taniwha again, repeating it. Then we just scrolled through the slides really fast and the taniwha swum up the river. Try it it’s lots of fun.
Kids will have a ball!!
You can also take it a step further by embedding the presentation into a blog or Google Site. All you have to do is publish it to the web and change the timings a little…..
Go to FILE- PUBLISH TO WEB and change the size to small and tick the box that says ‘Start slideshow as soon as the player loads’.
Take the embed code and copy it to where you want the presentation to load and change the timing. For where it says 3000 change it to something like 300. And publish.

So this way the animation will play without having to tap away to progress the slides.